Un-droiding your ASUS Transformer
- If your daily IT cycle does not span much beyond Google/Facebook/Youtube/etc, stop reading this and do not change a thing. Your Android will perform more than well (and it looks very nice, too).
- At the time I am writing this, the TF101 is being shipped with Android 3.2, the latest Ubuntu is 11.10, I have OLiFE 1.2a to work with and rooting only works on SBKv1 devices
- Rooting the EeePad most likely voids your warranty
- Your existing data will be wiped as the internal card gets repartitioned
- The chances of something going wrong are close to none, but if you still find a way to brick your EeePad - neither Steven Barker nor myself should be urged to buy you a new one.
Even though Android certainly pleases the eye and boasts some really ingenious solutions, it is by no means suitable for everyday computing tasks on anything larger than a palm device.
Despite some of its annoying design flaws and the fact that it comes with Android baked onto it, the TF101 is still a revolutionary piece of equipment, and in my humble opinion the best mobile thingummy (a lot of) money can buy.
Now, using a bootable USB with a live image will not do the trick here. Since the Android is seriously integrated into the EeePad, plus the way the device handles things at boot time, you will have to resort to a slightly more radical approach, namely flashing the Linux onto the EeePad.
Step 1: Check your EeePad's SBK
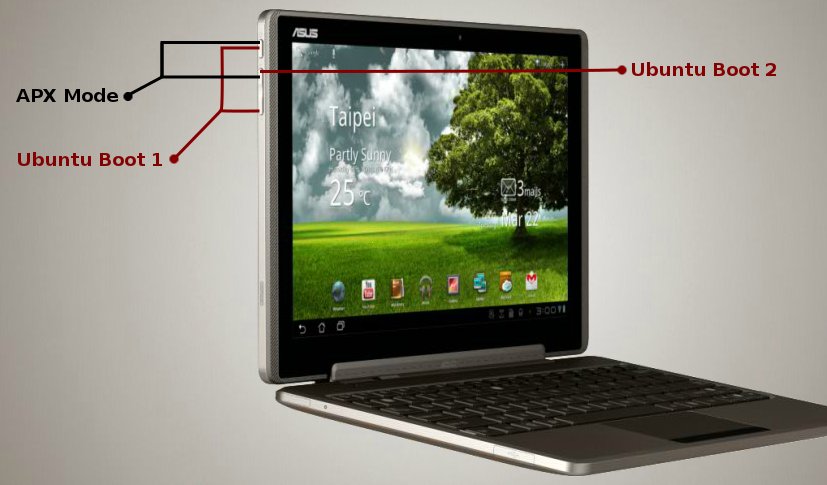
- Put your EeePad into APX mode. To do that, turn it off, then hold down the Power and Volume Up buttons together. The screen should go blank and stay that way. If the EeePad continues to boot normally, just repeat this step until you get it right.
- Connect the USB cable to your computer running Linux
- Execute the code below
cd ~/Desktop/ && wget -O sbkcheck.tar "http://forum.xda-developers.com/attachment.php?attachmentid=740980&d=1317840790" && tar -xf sbkcheck.tar && rm sbkcheck.tar && sudo ./sbkcheck
It should tell you the SBK version of your EeePad. If it is SBKv1, you are good to go.
Step 2: Download and install Prime
cd ~/Desktop/ && wget "http://lilstevie.geek.nz/ports/OLiFE-Prime-Edition.tar.gz" && tar -xf OLiFE-Prime-Edition.tar.gz && rm OLiFE-Prime-Edition.tar.gz && cd OLiFE && sh ./OLiFE.sh
The above code should download everything you need, and start the script.
- Once the script starts up, read what it says and type understood to continue
- At the list of operations type 2 to select flashing your device
-
At the flash options type 1 to select dual boot
Even though the preferred way would be to ditch Android altogether and directly boot into Ubuntu, bear in mind that Ubuntu is simply "not there yet". You will still need your Android until Ubuntu catches up to fully support your hardware.
- At the default OS list type 1 to select Android
Step 3: Install Ubuntu
- Turn off the EeePad. Hold down the Power and Volume Down buttons together until you see a message at the top left of the screen asking you to press the Volume Up button. Release the Power and Volume Down buttons and press the Volume Up button. The Ubuntu installer will now start.
- Do the installation as you normally would on a PC, and restart the EeePad.
Since Ubuntu is now on the "Rescue partition", from now on you will always need to use the trick from Step 3.1 to boot into Ubuntu. If you do not press anything, Android will start.
Words of Comfort
Don't worry if you go wrong during intallation. You can always start over until you get it right. I personally had to do it twice because I didn't press the Volume Up button quickly enough.